SZK Grease Pencil Groups++
Blender addon Animation Grease Pencil
Addon for Blender that makes Grease Pencil better!
Content
This Blender add-on
adds groups functionality( and more things❗ 🎉 ) to Blender’s Grease Pencil!
SZK Grease Pencil Groups++
Makes Grease Pencil better!
www.orb91.gumroad.com
It’s meant to make working with the Grease Pencil a more pleasant (and organized!) experience and to perform redundant tasks more quickly. Moreover, it also provides some new little features that make drawing with Grease Pencil more alike to drawing with other graphic softwares.
I made (and I’m making!) this addon for my daily use to simplify my life a bit, and I’m continously adding every improvement and idea I can think of, so its ensured to have the maximum quality possible! If you have an idea or something that you think will be cool to be implemented, I’m open to listen!
Current version: 1.4.8
Works for Blender 4.2 and below.
Installation 💻
- Download the .zip file with the addon and place it wherever you like.
- In Blender, go to
Edit → Preferences. Once there, press theAdd-onstab and pressInstallbutton on the top-right corner:
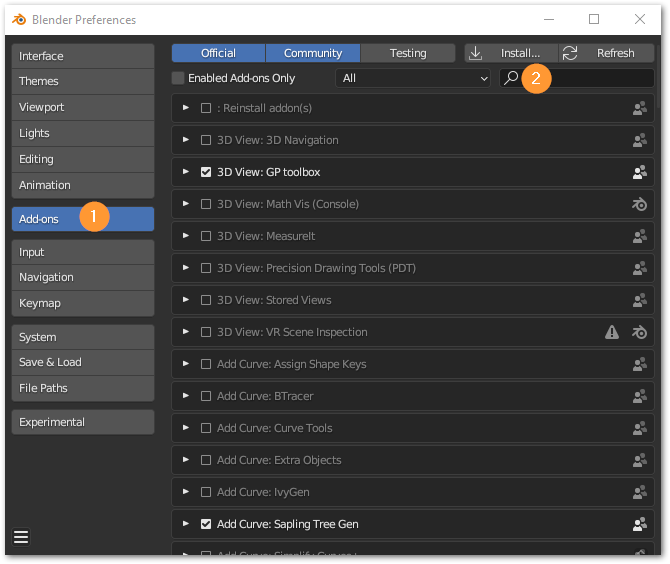
- Select the .zip file.
- Once installed, search for “Grease Pencil Groups” in the search bar, and enable the addon.
Setup 🛠
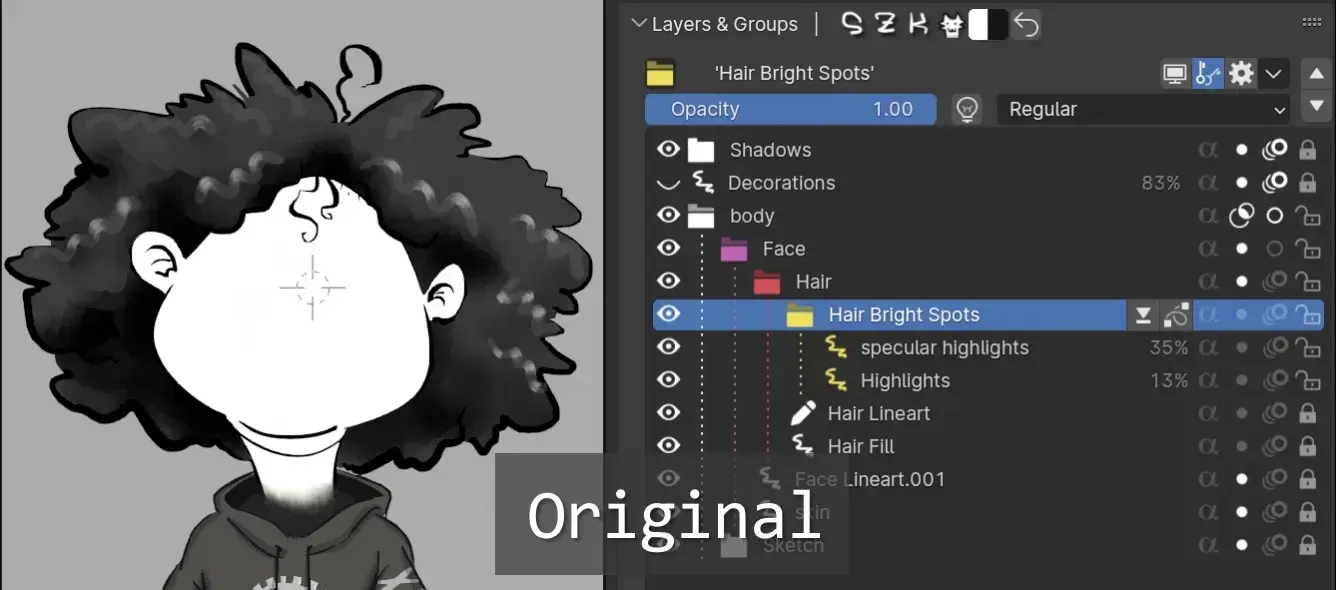
The add-on pannel will appear in the Properties panel, along with the original layer panel.
To start using it, simply click the Initialize button to add the current layers in the active Grease Pencil:
💡 Note: adding a layer outside the Layers & Group panel will make the group system to be outdated. If so, don’t worry, a button will appear to refresh changes.
I personally suggest that if you preffer to use the add-on panel instead of the old layer panel, just drag it on top (or whereever you like), so you don’t miss it:
I could have overriden Blender’s default layer panel, but I personally don’t like to get rid of original UI elements, in case some users would like to still use the native layer panel.
Interface 🖥️
TIP: Every button is documented and lots of operators have different options when they are pressed with CTRL/ALT/SHIFT. Everything is explained in their tooltip. Check the tooltip (by hoovering the mouse cursor) to discover new shortcuts and functionality.
Manual ⚙
Adding Layers/Groups +
Use the New Layer and New Groups buttons to add new elements.
- Add Layer ✏:
- Hold SHIFT to add the new layer above the selected element
- Hold CTRL when a closed group is selected, to add the new layer into it.
- Hold ALT to add the new layer below the selected group/layer
- Add Group 📂:
- Hold SHIFT to place the selected element into the new group.
- Hold CONTROL while having selected a group to place the new group inside the selected.
- Hold ALT to add a group below the selected item.
- Hold SHIFT+CONTROL to add a new group and put all the elements that are below it inside.
Deleting a Layer/Group ❌
Click the trash icon 🗑️ next to the New Group button to delete an element. If the selected element is a group, it will only delete the group, but leaves all their children.
You can delete the group and all its content by pressing the delete button while holding CONTROL.

Tip: Press SHIFT + Click to clean a Group 🧹:
This will delete all hidden layers inside a group.
Editing layers and groups
Changing a property in a layer will affect only to that layer. Modifying a property in a group, will affect to all its layers and groups contained.
Hiding the group will hide all its elements. Also, adding a mask to a group will add that mask to all its children. If you edit masks in a group, all their children will be edited.
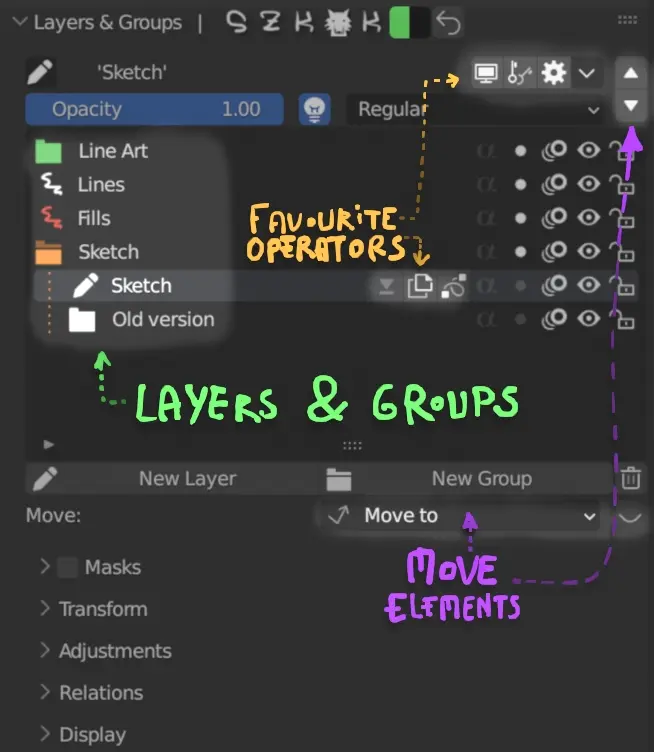
Moving elements ⤴
You can easily move the elements using the arrow buttons:
If you need to move an element “farther” and don’t want to move it step by step, you can use the Move To panel:

There, simply click an element to put the selected element inside/above/below it (by holding SHIFT/CONTROL (see the panel for more information)).
You can trigger the Move panel in the 3D View by pressing M while being in Paint Mode
Tip: If you want to move the elements faster and directly from the list view and bypass the move menu, you can press the 👁️️ button next to the Move To panel to show/hide the move buttons/operators:

By clicking the dots on the left, you will move the active layer/group like in the Move To panel.
Also, the same moving hotkeys apply here (see the tooltip for more info):
Merging Groups & Layers ⬇
You can merge layers as usual, but also combine the entire content of a group.
You can also copy a group into a single layer:
You can find the merge operator (and others) in the drop down menu accesed by this button in the top bar:

Tip: You can decide what operators to show in the layer/group and top bar with “favourite operators” in preferences
The addon comes with an improved way to merge layers when their opacity is lower than 1.0*
*Blender don’t merge correctly the layers when they have transparency.
With Blender’s normal merge behaviour (the transparency changes)
💪With the improved way to merge:

The result more faithful to the original state (without merging layers).
To activate this mode, press SHIFT + RightClick when executing the operator.
This will manually sets the (being slower to merge, but offering better results)
Customize Colors 🎨
You can edit the layer/groups colors by clicking their icon next to the name at the top of the list:
Tip: When changing the color of a group, you can:
- hold SHIFT to change the color of all child groups 📂
- hold CTRL to change the color of all layers ✏
- hold ALT to change all children’s colors ✏&📂
Open/close groups 📂
Click the folder icon to open/close a group.
You can hold ALT while clicking to open/collapse all children.
You can open/collapse all groups in the list by pressing a folder icon while holding ALT + CONTROL.
Tip: You can press SHIFT + Left Click in the group icon to add the element at the bottom directly to the group.
Press SHIFT + ALT + Left Click to ungroup the last element in the group.

Press SHIFT + Left Click to add the element below to a group.
Press SHIFT + ALT + Left Click to ungroup the last element in the group.
Solo Modes 🔍
Blender’s solo mode has been improved*❗
Originally, after exiting the solo mode all layers became visible (no matter if they were originally hidden), loosing the previous visibility states.
With this addon, you don’t loose any change on your drawing since it saves its previous state.
You can solo the layers/groups visibility 👁️ and lock 🔐 state.
The lock solo mode is specially -super- useful (❗) when sculpting, editing the strokes, weight painting, moving frames in the dopesheet, etc. (I use it a lot!)
You can find them in the menu (next to the move arrows). Or you can add a shortcut to it (see Favourite Operators in Preferences).
Both solo modes offers different filter levels:
- Selected - Only the selected element will be visible. If the selected element is a group, all its descendants will be visible.
- Siblings - Only the selected element and its siblings will be visible.
- Top folder - All elements in the root folder (in case of existing) will be visible.
It offers 2 possibilities for the visibility solo mode:
- Hide layers
- Opacity fade
Inherited alpha 🖌
Click the alpha button next to the layer/groups properties to activate it.
When Inherited alpha is enabled, the layer/group content will only be visible in their sibling’s opacity.
In this example, the base color and the shadow were drawn without considering whether they went outside the contour of the ball or not. When activating the alpha, its content is clipped by their siblings’ opactity, fitting perfectly into the ball’s silhouette.
This was a feature that prettends to imitate Krita’s inherited alpha.
Preferences 🛠
Settings ⚙
Use lighs by default- If True, (unparented*) new layers and groups will use lights when they are created.*If they are created inside a group, they will inherit the group’s current properties.
Keep Vertex colors when changing brushes- By default, each brush has its own main and secondary colour, so you lost the colour you had selected when changing to a new brush. Useful when you want to use another brush for its texture but you want to continue painting with the colour you had selected.Solo visibility mode- Select the method used when soloing the layers’ visibility.Offers 2 options:
Hide layers: only the layers filtered will be visible, while the others will be completely hidden.
Opactiy fade: the layers filtered will be visible with its original opacity, while the rest will be faded by the selected opacity percentage in prefferences.
Duplicate Prefixes/Suffixes- Set the prefixes (left) and suffixes (right) added when duplicating a group and a layer.Automatic check for new versions- If True (recommended), the addon will automatically check if there is a newer version uploaded.
This check happens only once when loading Blender
Appearance 👁️
Visibility icons on the left side- If True, the hide/show icon will be placed on the left (like in other graphic softwares like Krita or Photoshop).
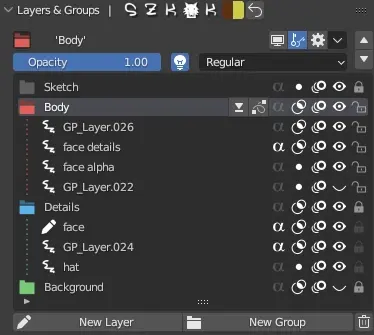
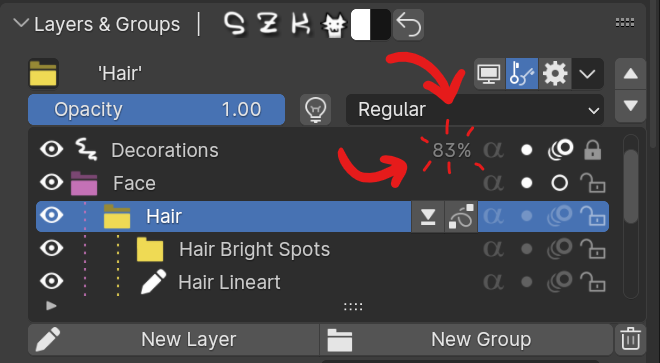
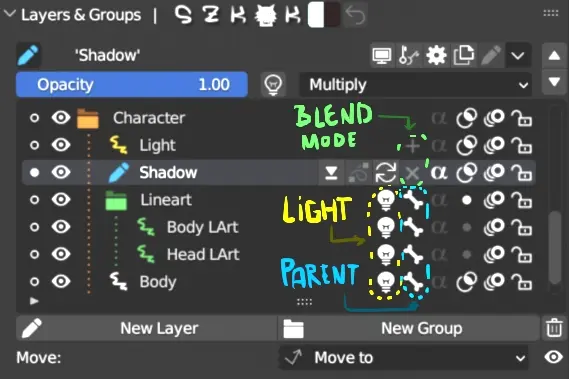
Show properties in list- Decide if showing of not extra info in the list.Use lights - Indicates if the layer/group is affected by lights
Blend Mode - Shows an icon with the blend mode used when is different than ‘Regular’
Opacity - Shows the opacity directly in the list when it is different than 100%.
Parent - Show a bone icon when the layer/group is parented to another object.
Favourite Operators
You can select your favourite actions in order to show them in the top bar and in the selected layer/group.
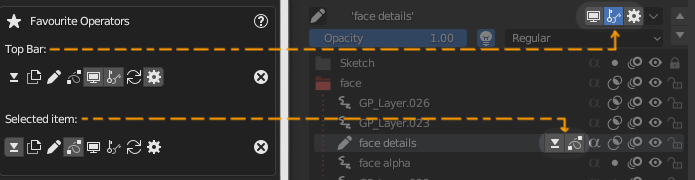
Hover/place the mouse over the icons to see their function.
Hotkeys ⌨
Hotkeys for the new functionalities.
Grease Pencil Paint mode 🖌
A - Switch between first and secondary color
E - Switch between Draw and Eraser
ALT + E - Switch between Paint and Sculpt mode
ALT + A - Pick/sample vertex color under mouse. (No need to manually go to the color each time to activate the color picker❗ 🎉🥳)

The colors are being sampled directly from the letters while painting (No need to go to the property and press E to activate the eyedropper 🥳)
SHIFT + A - Select previous Brush.
M - (In 3D View) Show “Move panel”
Grease Pencil Edit mode 📐
M - (In 3D View) Move selected strokes to another layer

FAQ❔
About Supporting Grease Pencil 3.0
About Updating to Blender’s Grease Pencil 3.0 (Blender 4.3 and Above)
Current State
The addon works correctly with Blender versions prior to Grease Pencil 3.0 (Blender 4.2 and below).
With the introduction of GP3.0 (Blender 4.3 and above), Blender now includes native support for groups—one of the main features originally provided by this addon.
While the addon also includes several additional tools and workflows, this native implementation significantly reduces its original purpose and importance in newer versions of Blender.
Additionally, the addon implemented groups through its own custom system. Because GP3.0 introduces a new folders and layers structure, adapting the addon directly is technically complex and may limit or break some of its original features, such as inherited alpha and certain customization tools.
One theoretical alternative would be to port the addon while ignoring the new GP3.0 structure and continuing to use the original system. However, this would not be an elegant or future-proof solution, and in practice there is no straightforward way to do a direct port.
For these reasons, I am currently evaluating if a port still makes sense.
Meanwhile, the addon stills a very useful tool if you are working on Blender’s versions prior to GP3.0.
About the Future
While working with GP3.0, I still strongly miss several capabilities originally provided by this addon (like the customization, some group/layer operators, the inherited alpha, and other workflow improvements).
The most reasonable long-term approach would be to rebuild the functionality from scratch, adapting it properly to GP3.0’s architecture. I have already started exploring this possibility, but at the moment I cannot guarantee that all features will be technically achievable, nor provide a timeline.
Why did you put icons on the header?
I personally like when I can distinguish clearly when some functionality comes from an addon I have installed and is not something native from Blender. Also, since I decided not to override the original Layer panel (in case someone would like to continue using it while having this addon installed), I wanted to make the panel to stand out from the other one.
Also, I like to show my dog, Dex:
Contact ✉
Twitter: @SuzukaKDev
Mail: suzukakadev@gmail.com
SZK Grease Pencil Groups++
Makes Grease Pencil better!
www.orb91.gumroad.com