SZK Timelapse Tool
Tool for creating .gif or .webp timelapses from pictures.
Content

Motivation & Intention
After finishing a Krita illustration, I had 50.776 frames (holy moly) capturing the whole process. I wanted to make a little gif with a timelapse, but I obviously couldn’t add all the images.
And I didn’t want to scroll through the 50k images and manually cherry-pick X frames after some interval/step, for then making the gif, because that is tedious.
There are other tools that converts a series of images into .gif, but the ones I tried lack of that step/interval option I was looking for. There are video editors where you can achieve that step-motion kind of effect. But they require a boring setup. Also, they usually do not support exporting to .webp (and converting (even) a raw video to .webp normally adds artifacts)
I wanted something fast and easy to use, with all the requirements I was looking for, so that’s why I made this.
Download
You can download it here:
Download 'SZK Timelapse Tool (1.1.1).zip' 54.9 mb
How to use it
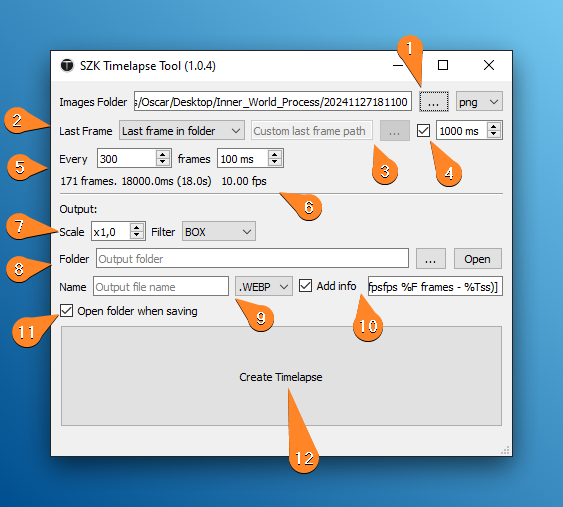
1 Input folder: Select the folder containing all the images and their format.
2 Select the last frame mode.
3 Manually selection for the last frame, when the mode in (2) is set to ‘Selected image’.
4 The duration of the last frame. If the checkbox is enabled, it will have a different frame duration than the other frames.
This is useful if you are showing a drawing process, and want the end frame to last more (for showing the final result).
5 Interval configuration. Picks a frame every X, and set the duration of each frame.
6 Info label: Displays the total frames, duration, and frames per second (fps).
7 Scales the original images by a factor, and choose the filter for the scale.
Depending of your needs (to scale up, scale down, mantain crips edges or not, etc) you would preffer one filter or another. For example, for scaling up pixel art, you normally would use Box or Nearest.
8 Output folder where the timelapse is saved.
9 Name file and format.
10 If checked, it appends some custom data to the saved file.
| Code | Output |
|---|---|
| %R | Resolution |
| %F | Total frames |
| %fps | Frames per second |
| %Ts | Total Time (in seconds (s)) |
| %Tms | Total Time (in milliseconds (ms)) |
| %st | Frame step/frequency |
| %s | Scale factor |
| %t | Frame duration (ms) |
| %t2 | Last frame duration (ms) |
E.g:
[x%s (%F frames - %fps)] Will append " [x1 (100 frames - 10fps)]"* to the file name.
* The values are according the selected settings.
11 If checked, opens the output folder after saving the timelapse.
12 Create Timelapse: Press to **drum roll 🥁🥁🥁** create the timelapse.
Timelapse examples

![]()


Contact
You can reach me via:
Email: suzukakadev@gmail.com
Twitter: @SuzukaKDev